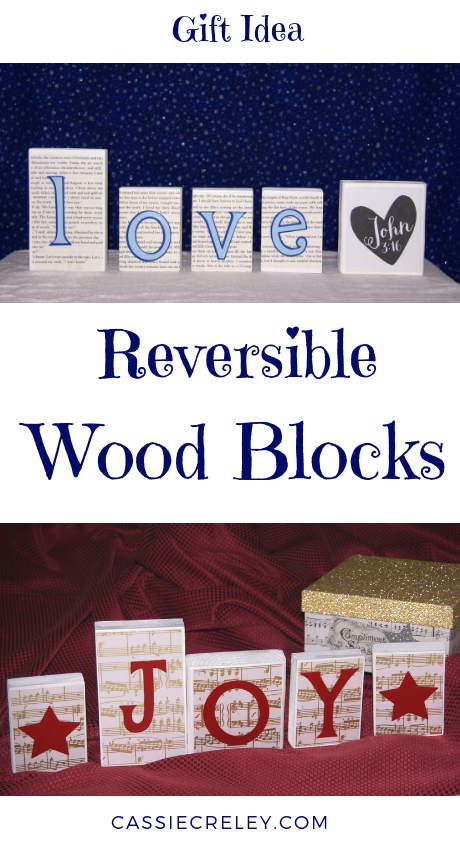
Reversible Wood Block Craft
I love creating wood block decorations, both for my own décor, and as gifts for friends. They’re super easy to make, and they can be customized to fit anyone’s style and color scheme. I made these wood blocks for a friend, using a Christmas-theme on one side, and an everyday theme on the other. I’ll walk you through the steps here.
This post contains affiliate links, which means I receive a small portion of sales, at no additional cost to you, if you click through and make a purchase. All recommendations are my own. Thank you for supporting my blog through your purchase!
SUPPLIES YOU’LL NEED
- Wood blocks of various sizes
- Wax paper (for protecting your work surface)
- Paint (I’ve linked to the brand I like best)
- Small paint brush
- A foam brush
- Music scrapbook paper (If you like the gold, here’s an awesome stack, the closest I could find online. No music notes though, as far as I can tell.)
- An old book (for the pages)
- Paper letters (cut from a Cricut, or use die cuts or letter stickers)
- Decoupage or Mod Podge
- Star paper punch
- John 3:16 scrapbook page–this set looks similar to mine (or a heart paper punch)
TO GET STARTED spread your wax paper out.
Paint the wood blocks and let dry. To get them to dry faster, paint a light coat, let dry, then add a second light coat.
Cut your music paper to fit the wood squares. My friend has a lot of gold in her Christmas decorations, so I immediately picked up this metallic gold scrapbook paper that looks like sheet music. If you can’t find paper like this, you could look for public domain sheet music online and print it. Be careful to let your printer’s ink dry for several hours before decopaging though, to prevent smudging. And use a light touch to decopage over the top.
Cut out the pages from the book to fit the wood squares. I cut from the middle of the book’s pages to keep the words more abstract. I also looked for poetic phrases like “stargazing,” “snowfall,” and “love letters.” In case anyone stands in front of the wood blocks and reads them, they’ll catch glimpses of words that evoke beautiful images.
Use a cricut paper cutting machine to cut out the desired letters you want on your wood blocks. I used “joy” for the Christmas-themed side, and “love” for the everyday side. If you don’t have access to a cricut, you can use die cuts or stickers. I used two layers of letters in different shades of blue, again to match my friend’s décor.
Apply a thin amount of decoupage to one side of each wood block using a foam brush, and place the music paper on top. Apply more decoupage over the music paper, covering all the way to the edges of the wood blocks to seal the paper’s edges. Add the letters and stars, then seal them in with another coat of decopage.
Let dry, then repeat on the other side of the wood blocks, adding the word “love” and the John 3:26 scrapbook page.
Voila, you’ve made beautiful wood blocks!
Blogging Tip: If you’re dreaming of starting a blog “someday,” start photographing your craft projects now. I take photos of pretty much everything I make (’cause I’m weird like that) but it’s paid off. I actually made these wood blocks several years ago, but since I had photos saved, I was able to use them to create this blog post.
Let me know how your wood block craft turns out!
What words did you use? Who did you make them for?
 |
 |
 |


One Comment
Pingback: